


What is a 3D floor plan of a storage facility?
A 3D floor plan is a three-dimensional model of your storage facility: the same units and corridors as on your 2D map, but with height, doors and roofs. You look at it from an angle, rotate around it and zoom in until you can read the unit codes. A flat map shows how the floor is laid out; a 3D view shows what the facility looks like.
That is not the same as a construction drawing or a photorealistic model. In self-storage a 3D floor plan is a working tool. It helps you recognise, explain and check a facility, and it shows the same status per unit as your map. Being recognisable and up to date matters more than looking impressive.
In TheStorageControl the 3D model is not built by hand but generated from the same unit shapes as the 2D map. Below you can see what that looks like for the fictional demo facility Capelle Rivium: one floor of 72 by 40 metres with 255 units in rows A to J, plus an office, a lift and a plant room.
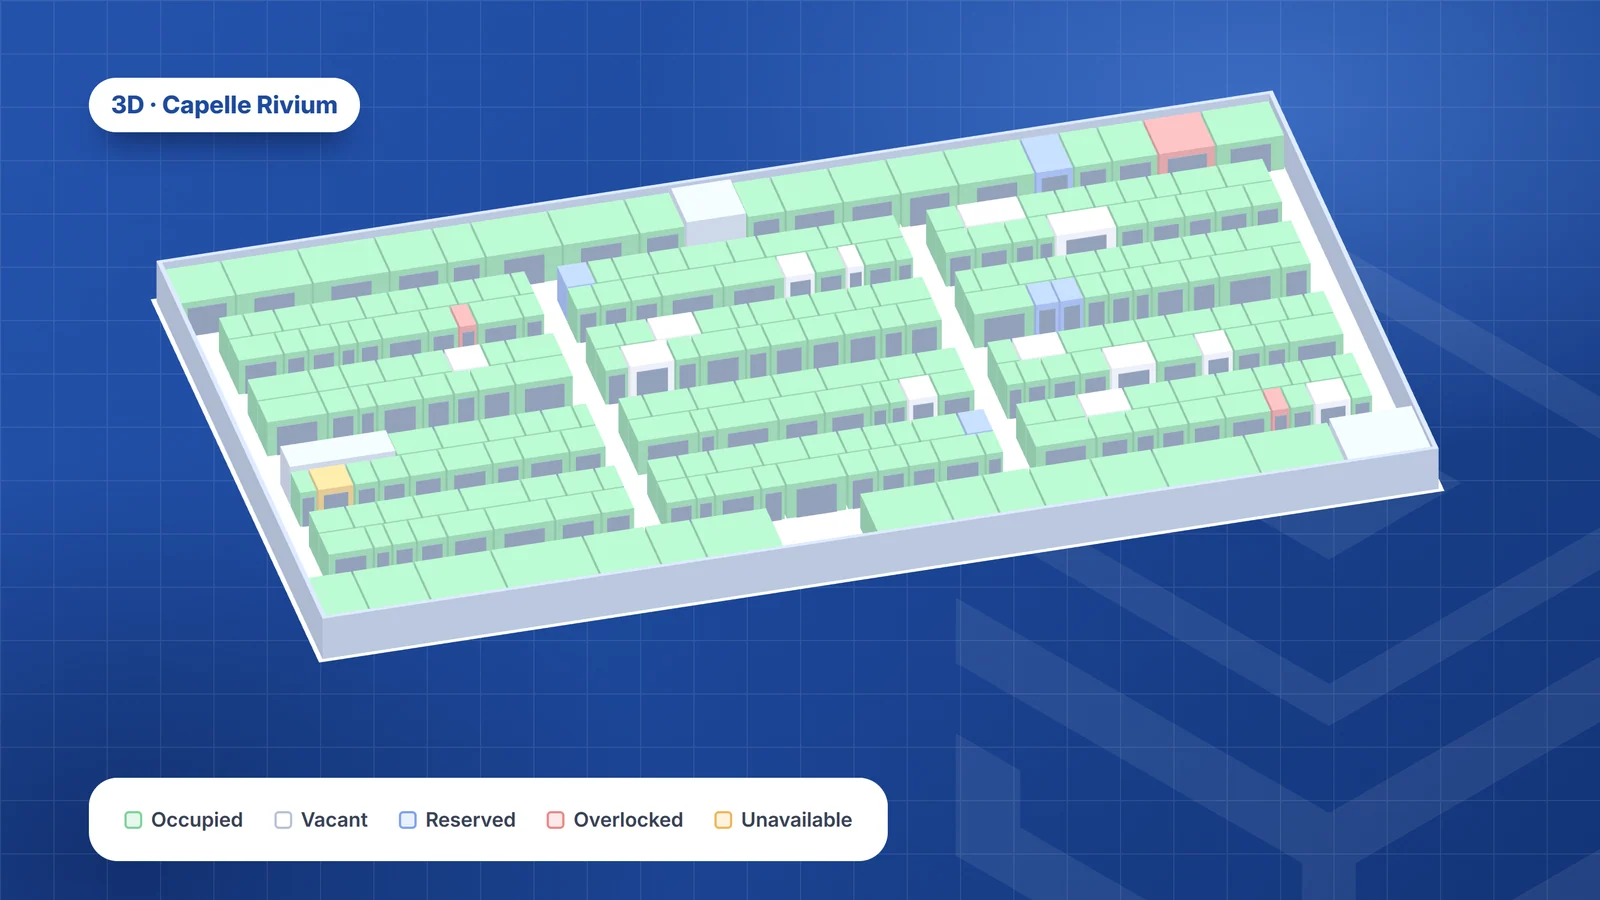
What is a 3D facility view useful for?
A 3D view does not replace your 2D map, but it helps at a few specific moments. Each time it comes down to the same thing: someone needs to understand the facility quickly, or you want to check that what is in the system matches the building.
- Getting to know a facility. A new member of staff sees how the rows are laid out, where the large units are and where the office and lift are, before the first customer is at the desk.
- Covering another site. A manager standing in for a colleague at a facility they know less well sees straight away which row is where and which units are vacant.
- Explaining it to someone who is not there. An owner, investor or head-office colleague gets a picture of the facility without having to read a floor plan: this is the building, this is the layout, this is what is vacant.
- Checking an import. After importing a drawing, the 3D view quickly shows whether the model looks like the building: is a row missing, is a unit in an odd place, do the proportions look right?
- Finding a unit and how to get there. Zoom in on one unit and see which corridor its door faces and which rows surround it. Useful when you give someone directions over the phone.
- Status at a glance. The roofs take the unit's status colour, so you see row by row what is occupied, vacant, reserved, overlocked or unavailable.
How is the 3D model built?
You can have a 3D model of a storage facility made by hand in drawing software. But then you have two sources that drift apart: change the layout and someone has to update the model separately, and until then it is wrong. For a working tool, that is a weak point.
That is why the 3D model in TheStorageControl is derived from the 2D map. Every unit shape on the floor plan becomes a block with the same outline, and after a drawing is imported the model is generated automatically, with corridors and doors. Change the floor plan and the 3D view follows, because it comes from the same shapes. The model is only loaded when you open the 3D view.
Height and doors are not on an ordinary floor plan. So these rules apply:
- Height: if the unit record holds a height between 1.5 and 6 metres, that height is used. Otherwise the unit gets a default height of 2.7 metres.
- Doors: every unit gets one door on the corridor side.
- Corridors: the corridors between the rows are generated as well.
- Roofs: each roof takes the colour of the unit's status.
- Codes: unit codes appear once you have zoomed in close enough.
Tip: record heights that differ
Without a stored height, every unit is 2.7 metres tall in 3D. If some units are clearly lower or taller than the rest, such as a row of half-height units or extra-tall units on the ground floor, enter the height for those units. The model then looks the part, and a new colleague recognises that row straight away.
2D map or 3D view: which do you use when?
Both views show the same units with the same status. The difference is in what each does well. The flat map is clearer for day-to-day work: every unit is visible, nothing hides behind anything else, and you filter by search term, status, size and price. The 3D view is stronger at recognising and explaining.
Below is the same fictional facility as a 2D map in status colours, so you can compare the two.
| Task | 2D map | 3D view |
|---|---|---|
| Day-to-day overview of vacant and occupied | Best choice: every unit in one view, with filters | Good for an impression per row; at an angle, units can hide behind each other |
| Finding a unit by size or price | Filter by status, size and price | Less suitable; search on the map first |
| Checking dimensions | Technical view with dimensions, when the scale is known | Not suitable: heights and doors are estimates |
| Showing a new colleague the facility | Works, but takes some practice in reading floor plans | Best choice: a recognisable building with rows, corridors and doors |
| Checking an import | Green, orange and red show what is matched and what needs review | Shows whether the whole thing looks like the building |
| Explaining how to find a unit | Shows which row the unit is in | Zoomed in, you see which corridor the door faces |
| Renting a unit | Click the unit: reserve or move in straight away | The same unit panel as on the map |
How do you navigate the 3D view?
You do not need to know any 3D software. Point at a unit and it lights up, and a selected unit stays highlighted, so you do not lose it when you rotate the camera.
Click a unit and the same unit panel opens as on the 2D map, with code, status, floor, size, rent per month, tenant and contract. An example from the fictional demo facility: unit D0111 is 7.5 m², costs €99 per month and is vacant. From that panel you start a reservation or move the tenant in straight away; those buttons open the normal reservation and move-in flows. For an occupied unit the panel offers other actions, such as a reminder or an overlock.
You control the camera with a handful of actions:
- Dragging orbits the camera around the facility.
- Zoom runs from close up, where you can read the unit codes, to the whole site in view.
- Top view places the camera straight above the facility, as on the 2D map.
- Fit brings the whole facility back into view when you have zoomed or rotated too far.
- Go to selection moves the camera to the unit you have selected, so you see it close up.
Where do you find the 3D view in TheStorageControl?
The 3D model is created automatically after a floor plan is imported, together with a technical drawing. There is nothing for you to draw or model yourself.
You see it in two places. When importing and in floor plan management there is a 3D preview, so you can check before publishing whether the model looks like your building. That preview is always available.
The Units page has four views: availability, map, grid and table. The map has three modes: operational in status colours, technical with the generated drawing and dimensions when the scale is known, and 3D. The 3D mode on the live unit map can be enabled per environment.
How to import and check a drawing, and how a drawing eventually becomes a rentable unit on the map, is covered in the other articles about the floor plan.
Tip: rotate the model before you publish
Once you have worked through the green, orange and red shapes, take one more look at the 3D preview. Start in top view and compare it with the drawing, then rotate slowly. A missing row, a unit standing in a corridor or a block much larger than its neighbours stands out without going through any lists.
What can a 3D floor plan not do?
A generated model is only as good as the data behind it. The shape of each unit is as accurate as your reviewed floor plan. Height and door are estimates unless you have stored the height per unit. The position of a door is always an estimate.
So do not use it as a construction drawing. For a refurbishment, a permit application or a quote from a contractor you need the drawings from your architect or technical designer. Structure, building services, ceilings and fire separations are not in the model.
Nor is it photorealistic. You see blocks in status colours with doors and corridors, not materials or signage. If you want to show a customer what the facility really looks like, photos or a viewing work better.
And for day-to-day work the flat map is often quicker: everything is visible at once and you can filter. Treat the 3D view as an addition to your map, not a replacement.


